
Be sure to read the entire procedure before doing anything!
If you own many game consoles you may have trouble storing them all. There are some entertainment center set-ups available, but those are often designes to hold a TV and a stack of stereo equipment. Game consoles are rarely a consideration. I mean they have been around for a while, there are at least a dozen different ones out there, why is there not a piece of furniture out there designed to hold a half dozen or more consoles for those of us who have many of them? Well here's something I designed and built that solves just that problem. The shelves are made to slide so that you can still put games into top loading systems.
Suggested Material
2 - 97" Pieces of Shelving board, of approximately 12" width and
3/4" thickness.
1 - 72" Piece of Shelving board, of approximately 12" width and
3/4" thickness.
Wood Glue and Finishing Nails.
1/4" plywood for backing, 18"x37" in size. (or 2 - 8"x37" pieces)
the wood width.
 These are just suggested materials, if you have better equipment available to you you could replace the cheap shelving board with somethng more robust like actual pieces of lumber. Generally the home audience is not equipped with a large sized electric plaining machine.
Construction
If you are using the materials listed above, be careful with the shelving board as the vineer scratches fairly easily. These instructions will assume you are using the maretials listed above. If you are not using them you wil have to adapt your methods slightly. You will need 8 shelf boards of 17" in length. Also you will need two sides 37" long and 1 top 19" long (for a 3/4" hang over, you you want more or less hangover this measurement will change). For the materials listed above, you should be able to cut 1 side and 2 shelves from the 6' (72") long piece; 1 side and 8 shelves from one of the 97" pieces; 1 top and 3 shelves from the last 97" piece. You could actually probably get away with replacing the second 97" piece with a 72" piece.
You will now need to make the grooves for the shelves to slide in. Remember you will need a little play in them to help reduce friction so they should be cut slightly larger than 3/4"wide (assuming your shelving board is 3/4" thick, adapt this as needed for alternate thicknesses). If you have a router and a bit large enough you can simply router the grooves out. If you have a table saw and a stacked blade piece that is capable of cutting grooves in panels feel free to use that. If you have neither you will have to use a normal table saw blade and cut on either side of each groove, then chisel the rest out. If you don't have a table saw at all then you will have to chisel the whole thing out. Each space betweent he shelves is 4" wide. if you are using wood for your shelves thicker than 3/4" you will HAVE to subtract from the size of this gap or you will not have enough space on the sides to fit all the shelves in properly. Also if you plan to put a NES game console in the cabinet it will need a 4" gap so if you must change the measurements do so accordinly. Anyway, layout the places where the grooves will be by starting at the top and measuring down 4 1/4" making a line/mark then 3/4" making a line/mark then 4", then 3/4" then 4" then 3/4" ect till you have 7 spaces laid out for the shelves (you should be almost to the bottom). Then measure up 3/4" from the bottom for the bottom piece's groove. The depth of the groovs should be 1/4"-3/8". Cut out the grooves and chisel them out if needed. BE SURE TO MAKE ALL THE GROOVES ON THE INSIDE WALL.
 Next use the same method as above to make the slots in the top piece where the sides will be inserted. These should be 3/4" wide as the top will need to fit snugly. They should be located 3/4" from the edge of the top (for the 3/4" hangover, if you are suing a differnt amount of hangover change this measurement).
Next assemble the outside frame. Be sure to test fit all joints before gluing! Add wood glue to the groovs in the top piece. Insert the top edge of the sides into the top piece grooves, be sure they fit all the way in the groovs. You may need to clamp them down. Be sure to not use too much glue. Next add glue to the bottom edge grooves on the sides and insert the 17" bottom piece into the groove. You SHOULD clamp this down. Use a square to make sure the corners are all squared up. If you absolutely cannot get all 4 corners perfectly square try for the best compromise as the sides may be bowing out a little bit. After the glue has dried add 3 finishing nails to each joint to help reinforce the joint. Be sure to use finishing nails so you do not have big ugly nail heads sticking out of your cabinet!
Next cut a 2" slip out of the middle of your backing piece. You should end up with 2 identical 8"x37" backing pieces. Attach these to to the back on the sides leaving a gap in the middle (for cords). You can use the backing to help fix any bowing you had and to help square up the cabinet. DO NOT APPLY TO MUCH PRESURE TO THE SIDE PIECES! The grooves are weak spots and will break with too much flexing! You may wish to set the shelves into the cabinet when applying the backing to know just how much you need to pull in or push out the sides. The shelves should be loose enough that you can pull them out and push them in easily, but not soo loose they fall on thier own..
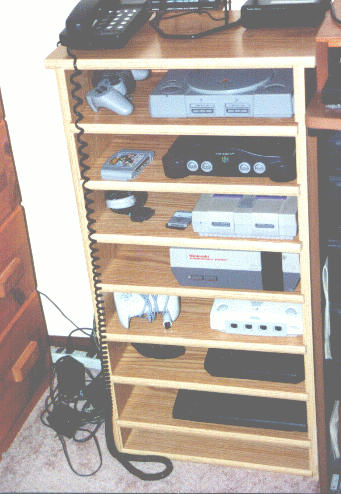
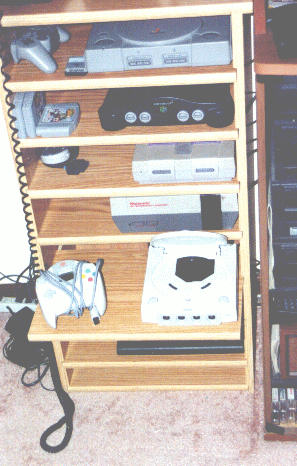
With the backing in you should be complete! Just add the shelves to the cabinet and fill with game consoles (assuming you have 7 game consoles). If the shelves do not fit you may need to chisel out the groovs a bit more or sand the shelves a bit. Also adding wax to the shelves and grooves may help.
For comparison's sake, here is what I had before the organizational power that is the Game Console Case.